Article Editing and Formatting
To watch a training video with tips on formatting, click here.
Staff.Wiki has a set of formatting options to increase the readability and organization of information in your policies and procedures. Keep in mind that Staff.Wiki is not a full-blown word processor, as it focuses not on typesetting creativity but on policy and procedure content. For this reason, it offers a limited number of options for formatting to ensure that all policies and procedures documents are laid out and presented consistently throughout the entire organization.
However, note that there is now a PDF / Word button in the toolbar that allows you to instead insert a PDF (or Word, Excel or PowerPoint document) to show up inside the article. This can be a useful option if you have content that is difficult to easily transfer into our editor. The content will usually be included in the search index, and will also show in the history/differences view to the degree that it's possible to extract plain text out of the PDF file. However, note that by using this PDF option you will lose some functionality such as in-article navigation. Also, to update the PDF content you will have to delete the existing PDF and insert a new one.
Getting back to the editor itself, the following formatting options appear when inserting or updating an article.
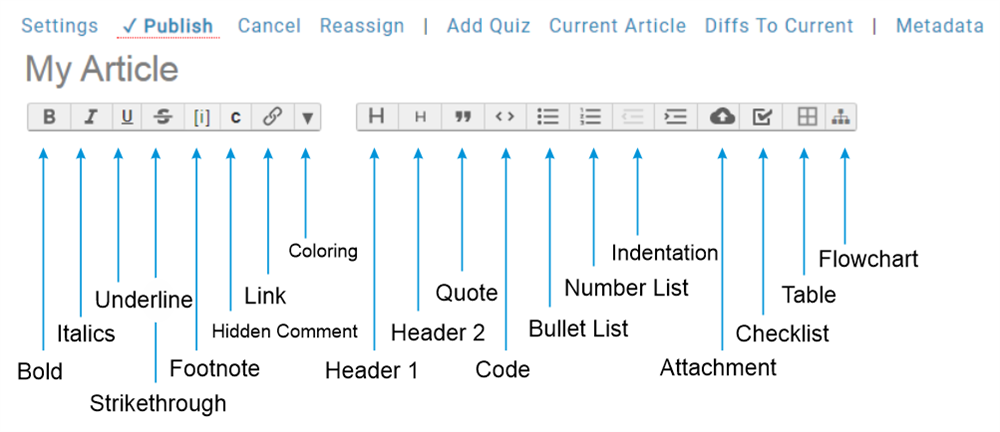
The content toolbar has many of the commonly used document formatting features found in most word processors.
All text formatting can be achieved by highlighting any text with your mouse cursor and clicking on the desired text formatting on the content toolbar.
The Bold, Italics, Underline and Strikethrough should be self-explanatory as they match the functionality of other word processors. You can toggle these formatting options by pressing the CTRL key with B, I and U.
Footnote
The [i] formatting hides the highlighted text and places a [*] in the document. When users hover over the [*], the footnote text will display similarly to tooltip text.
Number / Bullet Lists
There are two buttons for creating lists: the bullet icon and the numbered list icon. Clicking either of these will usually start the list at number 1, or show the first bullet. When you press enter, the next number in the series will appear.
If you need to add multiple lines to a list entry, press SHIFT+ENTER, instead of just enter. This lets you continue a single item on multiple lines.
To go to a new level, press the TAB key at the start of the list entry. This will make it a sub-level. For example, if the number was 3 and you pressed tab, it would become the (a) entry under 2.
Hidden Comment
Hidden comments are used to communicate amongst article editors or to leave notes about the contents within, but are not made viewable to general users.
The c icon will make the selected text hidden from general article view but only reviewable when editing or in Data View of article changes.
Coloring / Additional Formatting
The formatting button shows a menu with several options for coloring, highlighting, and other options such as showing smaller text.
In there you will also find options header level 3 and header level 4, along with an option to show small text.
Find/Replace
There is also an option in there to Find/Replace text (which will replace all occurrences of specified text in the article), and an option called Reformat that will apply various reformatting options to the selected text, such as converting the selection to a single paragraph and also removing all formatting.
Note: To perform a find/replace across multiple articles, you can use the Text Processing feature.
Heading
Headings are useful to visibly separate text and easier define the content being addressed in that section of the article. This allows the reader to quickly find the information in the article they are seeking.
Creating a heading is as simple as clicking the heading button (icon with a large of small H) in the content toolbar on a new line or a line with existing text. There are two levels of headings available. If you want to have further levels of headings, you can use bold or underline text. Alternatively consider splitting the article into sub-articles.
Be sure to press the return or enter key after creating the heading and then clicking on the heading button again once you've created each of your headings to resume adding regular text.
Note: the format menu lets you apply a header level 3 and header level 4 to your text.
Additionally, when 3 or more headings (H1) are added to an article, a secondary navigation will appear on the right hand side with a list of anchor links of each heading title.
If you wish to change the font used for all headings across the system, you can ask an administrator to do this. They should enter the font name in the Configuration tab, in Main Settings, in Styles/Layout section, under "Override Header Font".
Quote
The quote formatting feature is good for giving more prominence to blocks of text, quotations, citing references, and calling attention to 'need to-know' information.
Lines of text can be placed into a block to create a block quote by selecting a line and clicking on the double quotes icon.
This is an example quote block
Links
The link button lets you insert a reference to other articles or webpages throughout the internet. See this for more information.
Code
A code block is typically a specialized format for displaying lines of code which are easily readable for programmers and web developers. It converts a line of text into a mono-spaced serif typeface and places it into a block. It can also be used for other purposes where showing monospaced text is appropriate.
If a code block is needed, select a new line or desired text and click the < > button on the content toolbar.
This is an example code block
Optionally, special codes called mark-up can be used that let you create tables with merged cells. Details can be found in the Wiki Markup section.
Bullets / Numbering
There are two toolbar buttons for bullets and number lists. When you start a list, pressing enter will go to the next bullet or numbered item. You can press shift+enter to create a new line without going to the next numbered item. If you press enter twice, you'll exit the list and go to regular paragraph text.
When in a list, you can press the tab key at the start of the item to promote that to a sub-item or sub-number. You can press shift+tab to demote or go back to the parent number or bullet item. The left/right arrow buttons in the toolbar will do this also.
You can promote multiple entries at once by multi-selecting them and then clicking the button.
Note: You can change the style of the numbering (eg. 1.2.3.4, or 1.b.iii.A) on the Configuration tab, in Main Settings under Number Styles. This changes it for all articles, however.
Attachments
The attachment button lets you insert images and videos, and also upload documents such as PDF files as links. For more information see here.
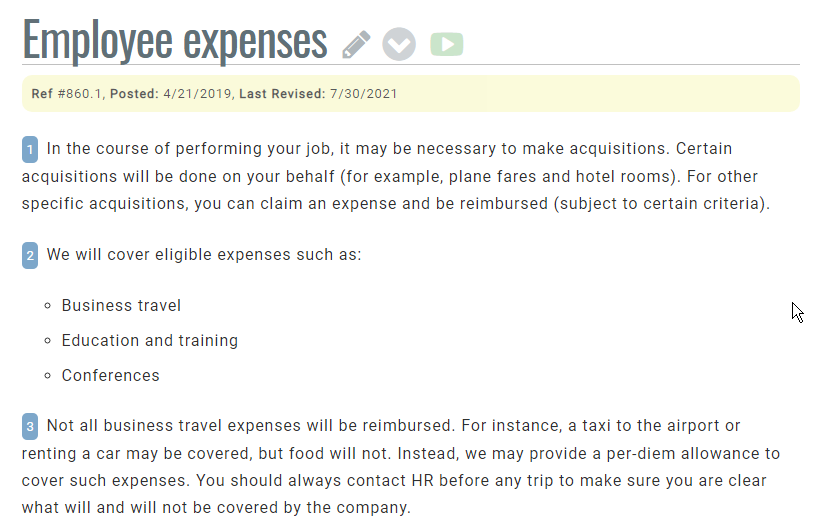
Paragraph Numbering
While you can add numbered lists into articles as shown above, you can also have Staff.Wiki show all articles with numbered paragraphs. This can be useful if you need to frequently reference specific paragraphs in policies or procedures.
You can enable this in the Settings, by switching the checkbox "Paragraph Numbering" to Yes.
Once enabled, this option will also show some other metadata at the top of the article, such as the unique policy number, its current revision, when it was first published and when it was last updated.
An example of this can be seen below:
Note: While editing, there is also a draft/approver chat that you can use to discuss the changes with other approvers.